Thursday, January 29, 2015

Using SB Portal to Access Your SAN Folder/H-drive from Your Home Computer

Recently we received a call from a teacher asking how a student can access their network drives from home on their own computer. Well, this is how it is done. And it works for employees too!

1. Go to http://sbportal.springbranchisd.com. 

2. Type your SBISD login name in the Username field.

3. Type your SBISD password in the Password field.

4. Students need to change the item in the Domain field to show “SBS” (Employees need to use
     “SBM1”).

5. Click the Log In button.


6. A screen will appear with monitor icons. Click on one of the monitor icons.


7. A desktop screen with the SBISD logo will appear. It may take a minute or so, but the desktop
     icons will eventually appear.

8. Click the “folder” icon in the task bar.


9. In the left column of the window that opens, click Computer. 


10. Double-click the icon for your SAN Folder/H-Drive.


11. You now have access to your SAN Folder/H-Drive. You may edit your documents that you have
      in here. If you open a Word, Excel or PowerPoint file, it will open in OpenOffice instead of
      Microsoft Office. You can make changes but when you save, it will save as an OpenOffice
      document instead of a Microsoft Office document. OpenOffice documents can be edited by
      Microsoft Office so no need to worry when opening the file later in Microsoft Office when on a
      district computer.


When finished, be sure to log out!!

12. Click the “arrow” button in the top center of the screen.


13. Click your username on the right side of the screen.

14. Click Disconnect.


15. Click the Yes button.


16. Click the Log Out button on the next screen.


17. Click the Yes button.


Tuesday, January 27, 2015

New Students and Transferring Grades

When a student has been scheduled into your class after school has started, a "New" button will appear next to the student's name. When you click this button, you will see five different options. The option(s) you choose will depend on the scenario of the transferring student.

1. Click the New button to begin the process of transferring grades.


2. If you want to get rid of the New button, uncheck Do not display NEW by this student's name.


As you read through this document you will see instructions for all 5 options. You are free to use whichever option(s) you see fit when transferring grades for new students but we have provided you with the most common scenarios and recommendations for each.

Scenario #1: Student has transferred from one class period to another class period of the same teacher (course number must be identical) Recommended: Use Option #1.

Scenario #2: Student has transferred from one class period to another class period of a different teacher (course number must be identical) Recommended: Use Option #5 to transfer assignment grades for the current grading period and Option #4 to transfer term grades for closed grading periods (if applicable). Option #2 can be used but you may find it more tedious and time-consuming.

Scenario #3: A student has transferred from a class on the campus to any other class on the same campus. Recommended: Use Option #5 to transfer assignment grades for the current grading period and Option #3 to transfer term grades for closed grading periods (if applicable). Option #2 can be used but you may find it more tedious and time-consuming.

Scenario #4: A student has transferred to the campus from another SBISD campus. Recommended: Use Option #5 to transfer assignment grades for the current grading period and Option #3 to transfer term grades for closed grading periods (if applicable). Option #2 can be used but you may find it more tedious and time-consuming.

Scenario #5: A student has transferred to the campus from another district. Recommended: Use Option #5 to transfer assignment grades for the current grading period and Option #3 to transfer term grades for closed grading periods (if applicable).


Option #1 – Auto-Transfer Scores from Dropped Section of this Course

This option is ideal if a student transfers from one section of a class to another section of the same class with the same teacher.

1. Click Transfer Matching Scores.


2. Click Save.

Back to Top

Option #2 - Transfer Assignment/Term Scores From a Dropped Class
This option works with students who have transferred to a class from any other class on campus.

1. Click the dropdown menu to choose whether to transfer both assignment grades and term grades or term grades only.


2. Select the dropped course from which you would like to transfer grades.


3. Click Manually Transfer Scores.


4. Click the Grade link for the assignment in your gradebook that you would like to transfer a grade to.


5. Click Transfer for the grade from the dropped course that you would like to transfer to the assignment in your gradebook.


6. If you have entered a grade for all assignments in your gradebook, click Complete Assignment Scoring. You may also click No Count Ungraded Assignments & Complete Assignment Scoring to change all of the student's ungraded assignments in your gradebook to "No Count."


7. You may adjust term grades if you wish. Note: This cannot be done until the term you are trying to adjust has ended.


8. You may also enter an exam score.


9. Click Save Term/Exam Grades and Enter Semester Grades.


10. You may enter a semester grade.


11. Click Save Semester Grades and Finish.

Back to Top

Option #3 - Manually Enter Term Scores
 This option works well for students transferring from another campus or district.

1. Click Manually Enter Scores.


2. In the New Grade column, type in the grade for each term.


2. Enter the semester grade and click Save Term Grades and Finish.

Back to Top

Option #4 - One-Click Transfer Term Percents from Dropped Section of this Course
This option works with students who have transferred from one section of a class to another section of the same class within the campus.

Click Transfer Percent.

Back to Top

Option #5 – Enter a Starting Grade Percentage for the Current Term
This option will allow you to enter a term average for the current term. It is best to do this before entering any assignment grades for the current term for the new student.

1. Click Enter a Starting Grade.


2. Enter the term average that you would like the student to begin the current term with. Then click Apply Grade Percent.

Back to Top


Restoring Deleted Files

Have you ever deleted a file and realized later you shouldn't have done that? If so there is a way it can be restored, if it was on your SAN Folder (H-Drive). The following will demonstrate how to restore deleted files to your SAN Folder.

1.      Go to your SAN Folder (H-Drive) and right click on the folder that had the deleted file.

2.      Choose “Restore Previous Versions.”
 

3.      You will see a list of different versions of the folder.

4.      Select a version that is has date/time prior to when your file was deleted.

5.      Click “Open.”

6.      The selected version of the folder will open.

7.      Locate the deleted file. Right click on the file and choose "Copy."
 

8.    Go to the folder where you would like to place the file. Right click and choose "Paste."


9.    The item is now restored.

Working From Home on Your SBISD Laptop

Want to work from home on your SBISD Laptop? Our SonicWall VPN client allows you to do just that. Work from home just like you are at your desk! The SonicWall VPN client should already be on your computer but it will need to be configured before you can connect from home.

The following will demonstrate how to configure the SonicWALL VPN client on your SBISD laptop. This must be done while you are at home. You cannot be on the SBISD Network when doing this. 


1.      Go to > Programs > SonicWALL Global VPN Client.


2.      If you receive this message, click Unblock.


3.      Click Next.


4.      Select the Remote Access option, then click Next.


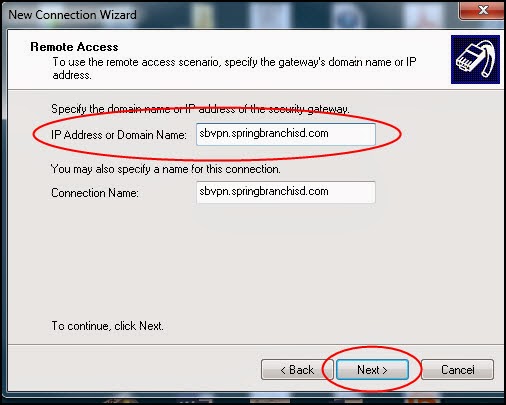
5.      Click your mouse in the IP Address or Domain Name field and type in sbvpn.springbranchisd.com then click Next.


6.      Place a check in both boxes then click Finish.


7.      If you receive this message, click OK.


8.      Click Enable to establish the VPN connection.


9.      If you receive this message, click OK.


10.      A shortcut icon will now appear on your desktop. Double click on this icon to start VPN.


Thursday, December 18, 2014

Technology Buyer’s Guide

The Buyer’s Guide saves you from having to do your own research when purchasing technology items. We’ve made changes to the Technology Buyer’s Guide to save you time and make the search process more user friendly.

The “Pre-Approved” section on the Buyer’s Guide contains categories that may potentially interfere with what’s already here on our data network – like computers, ActivBoards, etc. For these categories, we have pre-selected and pre-certified models that will work without causing problems in our network. No approval is necessary if you buy one of these pre-selected, pre-certified items on the Buyer’s Guide.

If you want to buy something in one of the categories listed in the “pre-approved” section but the item you want is not listed there, please submit a Technology Service Request describing what you are looking for.

The second section, titled “Also Available on the Buyer’s Guide,” is for things like cables where interference is not a potential issue but we have listed several commonly purchased items so you don’t have to spend time searching/researching.

If what you need doesn’t fall under one of the “pre-approved” categories, you may purchase it from an approved vendor.

If you are not sure what you need or if you need help figuring out what you may need, open a Technology Service Request. We will be in touch with you to find the best solution that doesn’t pose a problem to our network.


Happy Holidays!


Tuesday, December 16, 2014

Technology Buyer’s Guide

The Buyer’s Guide saves you from having to do your own research when purchasing technology items. We’ve made changes to the Technology Buyer’s Guide to save you time and make the search process more user friendly.

The “Pre-Approved” section on the Buyer’s Guide contains categories that maypotentially interfere with what’s already here on our data network – like computers, ActivBoards, etc. For these categories, we have pre-selected and pre-certified models that will work without causing problems in our network. No approval is necessary if you buy one of these pre-selected, pre-certified items on the Buyer’s Guide.

If you want to buy something in one of the categories listed in the “pre-approved”section but the item you want is not listed there, please submit a Technology Service Request describing what you are looking for.

The second section, titled “Also Available on the Buyer’s Guide,” is for things like cables where interference is not a potential issue but we have listed several commonly purchased items so you don’t have to spend time searching/researching.

If what you need doesn’t fall under one of the “pre-approved” categories, you may purchase it from an approved vendor.

If you are not sure what you need or if you need help figuring out what you may need, open a Technology Service Request. We will be in touch with you to find the best solution that doesn’t pose a problem to our network.


Happy Holidays!


Monday, December 15, 2014

Adding SBISD Email to Your Android Phone

The following will demonstrate how to set up your SBISD Email on your Android Phone. This way you don't have to be at a computer to check your email. You can check it from wherever you happen to be standing!
Please note that these steps may vary from what you actually see on your phone screen. Android Phones may differ slightly from one to another.
1. Tap Settings.  
2. Tap Accounts & Sync. 
3. Tap Add Account.
4. Different phones have different wording but you should see a button titled Corporate, Corporate
    Sync
,Exchange, Exchange Active Sync, or Microsoft Exchange. Tap this button.
 
5. In the Email Address field, type your full SBISD Email Address. ex: john.doe@springbranchisd.com
6. In the Password field, type your SBISD email password.
7. Tap Next.
8. In the Domain\Username field, type "sbm1\" followed by your SBISD username. ex: sbm1\doej
  
9. In the Server field, type "owa.springbranchisd.com"
10. Select the box to Use secure connection (SSL).

11. Select the box Accept all SSL certificates.
12. Tap Next.
13. On the Account Options screen, choose how often you would like your phone to sync your email.
14. Tap Next.
15. Tap Done.
16. Your SBISD email is now synced to your Android Phone.


Twitter Delicious Facebook Digg Stumbleupon Favorites More